Set Up Your Domain
To get Alice fully operational on your domain, two things need to be configured: DNS records (so Alice can send emails as your brand) and email forwarding (so Alice can receive tenant replies). Our team will handle both of these for you during your onboarding call — this guide serves as supporting documentation if you'd like to understand the process or follow along.
DNS Records
Allows Alice to send emails from your domain
Email Forwarding
Routes tenant replies back to Alice
DNS Records — Sending Emails as Your Brand
DNS records tell email providers like Gmail and Outlook that Alice is authorised to send emails on behalf of your domain. Without these, emails from Alice could land in spam or show a generic sender address instead of something like alice@yourcompany.com. We will generate the exact records you need — all you need to do is add them to your domain provider.
What DNS records look like
| Type | Host / Name | Value | TTL |
|---|---|---|---|
| TXT | @ | v=spf1 include:amazonses.com ~all | 3600 |
| CNAME | resend._domainkey | [unique-key].dkim.amazonses.com | 3600 |
| MX | @ | feedback-smtp.us-east-1.amazonses.com | 3600 |
These are examples — your actual records will be provided by our team during setup.
How to add DNS records
Adding DNS records is done through your domain registrar — the service where you purchased your domain. The process is similar across providers: navigate to your DNS settings, add each record we provide, and save. Here are direct links to guides from popular providers:
Don't see your provider? No problem — our team will walk you through it.
Email Forwarding — Receiving Tenant Replies
When a tenant replies to an email from Alice, that reply needs to be routed back into our system. To make this work, you set up an email forwarding rule that automatically forwards incoming emails to a unique address we provide for your account. This address is based on your organisation ID — for example: your-org-id@prenooren.resend.app.
How it works
We provide you with your unique forwarding address
You create a forwarding rule in your email provider
Tenant replies are automatically routed to Alice
How to set up email forwarding
Setting up a forwarding rule is done through your email provider. The steps vary slightly depending on which service you use. Here are direct links to guides from popular providers:
Gmail / Google Workspace
Google Workspace uses Default Routing rules in the Admin Console to forward emails. Follow these steps to route tenant replies to Alice:
Navigate to Routing
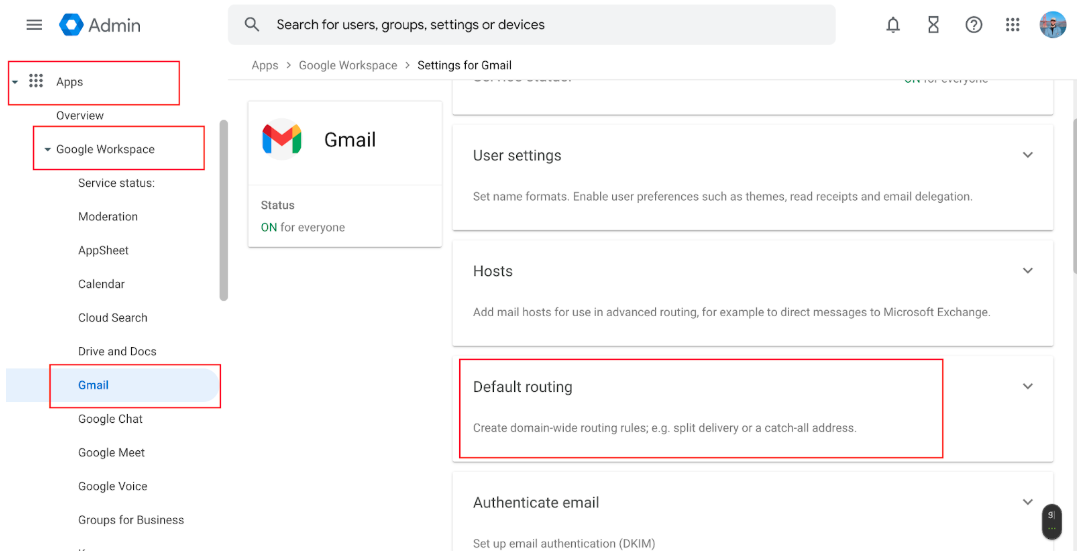
In the Google Admin Console, go to Apps → Google Workspace → Gmail, then scroll down and expand Default routing.
Add a New Rule
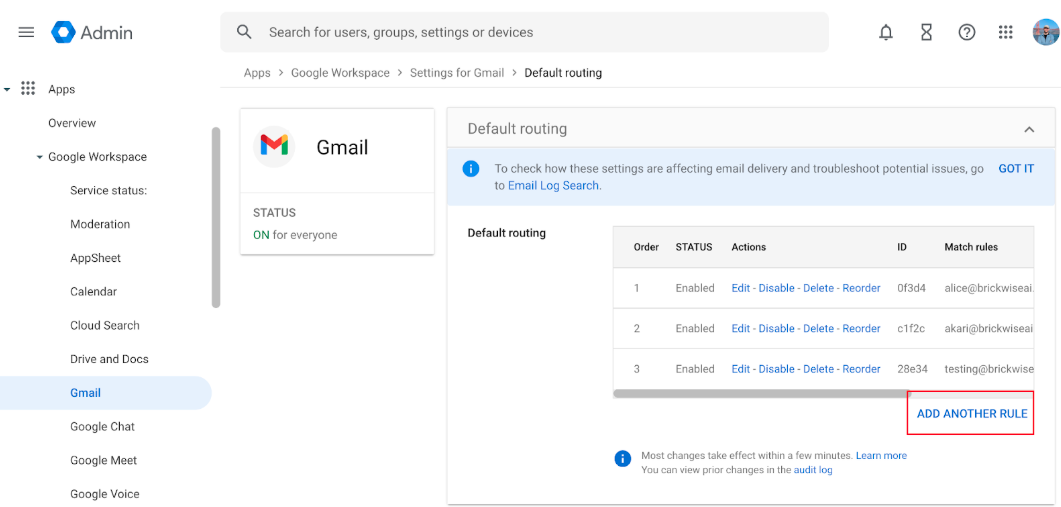
Click ADD ANOTHER RULE at the bottom of the Default routing section to create a new routing rule.
Set Recipient for Your Custom Domain
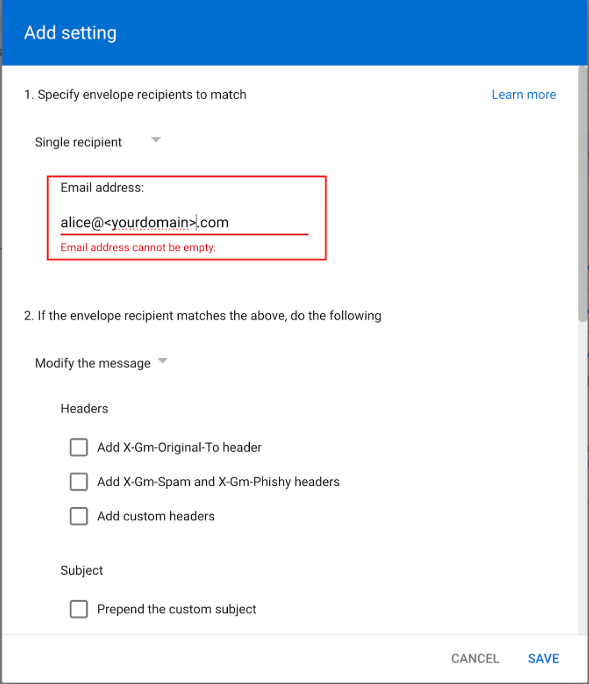
Under "Specify envelope recipients to match", select Single recipient and enter your Alice email address (e.g. alice@<yourdomain>.com).
Step 4 — Configure Forwarding
Choose one of the two options below depending on whether you have an existing user/inbox set up for the Alice email address.
No User Inbox Set Up for This Address
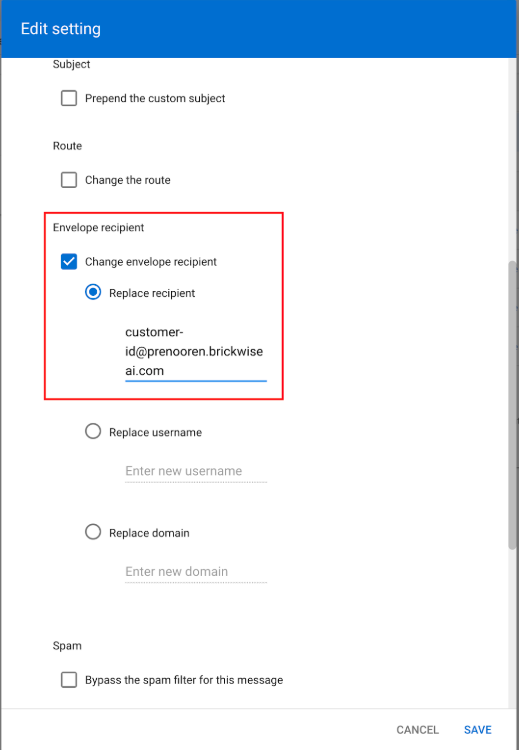
If there is no existing mailbox for the Alice email address, check Change envelope recipient and select Replace recipient. Enter your unique forwarding address (e.g. customer-id@prenooren.brickwiseai.com). This sends the email directly to Alice.
User/Inbox Already Set Up for This Address
If there is an existing mailbox for the Alice email address and you want to keep receiving emails there too, scroll to "Also deliver to", check Add more recipients, and add your unique forwarding address (e.g. customer-organization-id@prenooren.resend.app). This delivers the email to both the existing inbox and Alice.
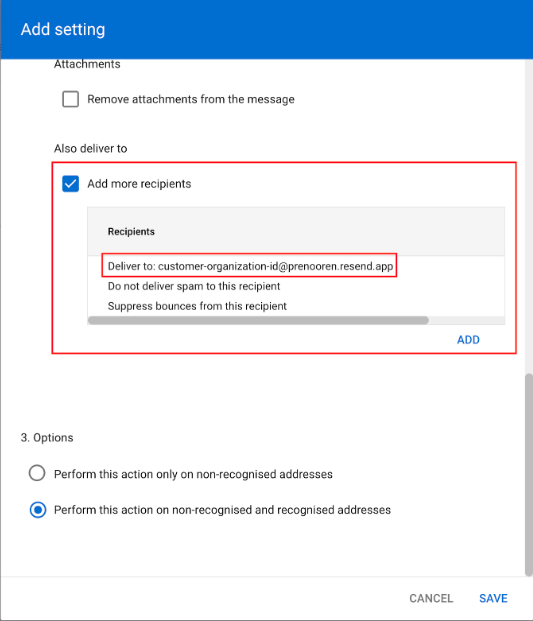
Finally, under Options, select "Perform this action on non-recognised and recognised addresses", then click Save.
Don't see your provider? No problem — our team will walk you through it.
Verification and Timeline
Once both DNS records and email forwarding are in place, our team will verify everything is configured correctly and send test emails in both directions. The entire process typically takes around 10 minutes of your time. DNS changes can take up to 24–48 hours to fully propagate, but we will monitor this and let you know when everything is live.